Why Kubernetes
A large scale Laravel application needs a few different services to operate properly. Kubernetes allows us to horizontally scale each of the services. We can achieve massive scale without any code changes while maintaining full control over our infrastructure.
Your infrastructure is stored in code allowing it to be easily upgraded or recreated.
- How to install a development setup
- Install Docker
- Install Minikube
- Install kubectl
- Using Kubernetes and Docker
- Use docker to build your own container
- Run and access a basic container
- Pushing containers to Minikube’s docker registry
- Using container from local registry
- Running a Laravel application
- Php-fpm container
- Nginx Container
- PRODUCTION!
How to install a development setup
We’ll start out by learning how to run a miniature cluster on our own computer. Then we’ll move to a production setup using a cloud provider.
First you’ll need to install docker for working with containers. Docker includes a container runtime and tools to build containers. Head over to https://www.docker.com and install the latest stable version.
Next, install Minikube. Minikube is a development focused Kubernetes cluster that you can run locally. It’s not production ready but it’s perfect for learning and testing. Available here:https://minikube.sigs.k8s.io.
After installing, start it with: % minikube start --vm=true █
And finally install kubectl. Kubectl is a command line tool that allows you to interact with a Kubernetes cluster. You’ll use it in production and development. A cluster and the authentication details needed to access it are collectively known as a context.
After installing kubectl, try running % kubectl config get-contexts █ . You should see your minikube cluster.
Building a basic container
The 3 files are Dockerfile, nginx.conf, and index.html.
Dockerfile contains the instructions for Docker to build the image.
The nginx.conf has a basic configuration to serve the index.html file and the index.html is the content that will be displayed.
cd into the directory then run: % docker build . --tag=basic-nginx’ █
This builds then publishes the container to our local Docker repository.
We’ve successfully built and run a container in docker, next we’ll run it on Kubernetes.
Running the container in Kubernetes
Now to run the container in Kubernetes, we’ll start to touch the surface of infrastructure as code.
We need to create a deployment file which instructs Kubernetes on how to run our application.
The important parts are the image name which needs to match the tag we gave in docker build, the imagePullPolicy, and the selector: matchLabels which will be used for networking later.
imagePullPolicy: Never tells Kubernetes that the image exists locally, i.e. not on Docker hub.
Run % kubectl apply -f basic_deployment.yaml █ to create the deployment. You should see a message that the deployment was created.
Start the Minikube dashboard by running % minikube dashboard █ . That will open your browser to the Kubernetes dashboard.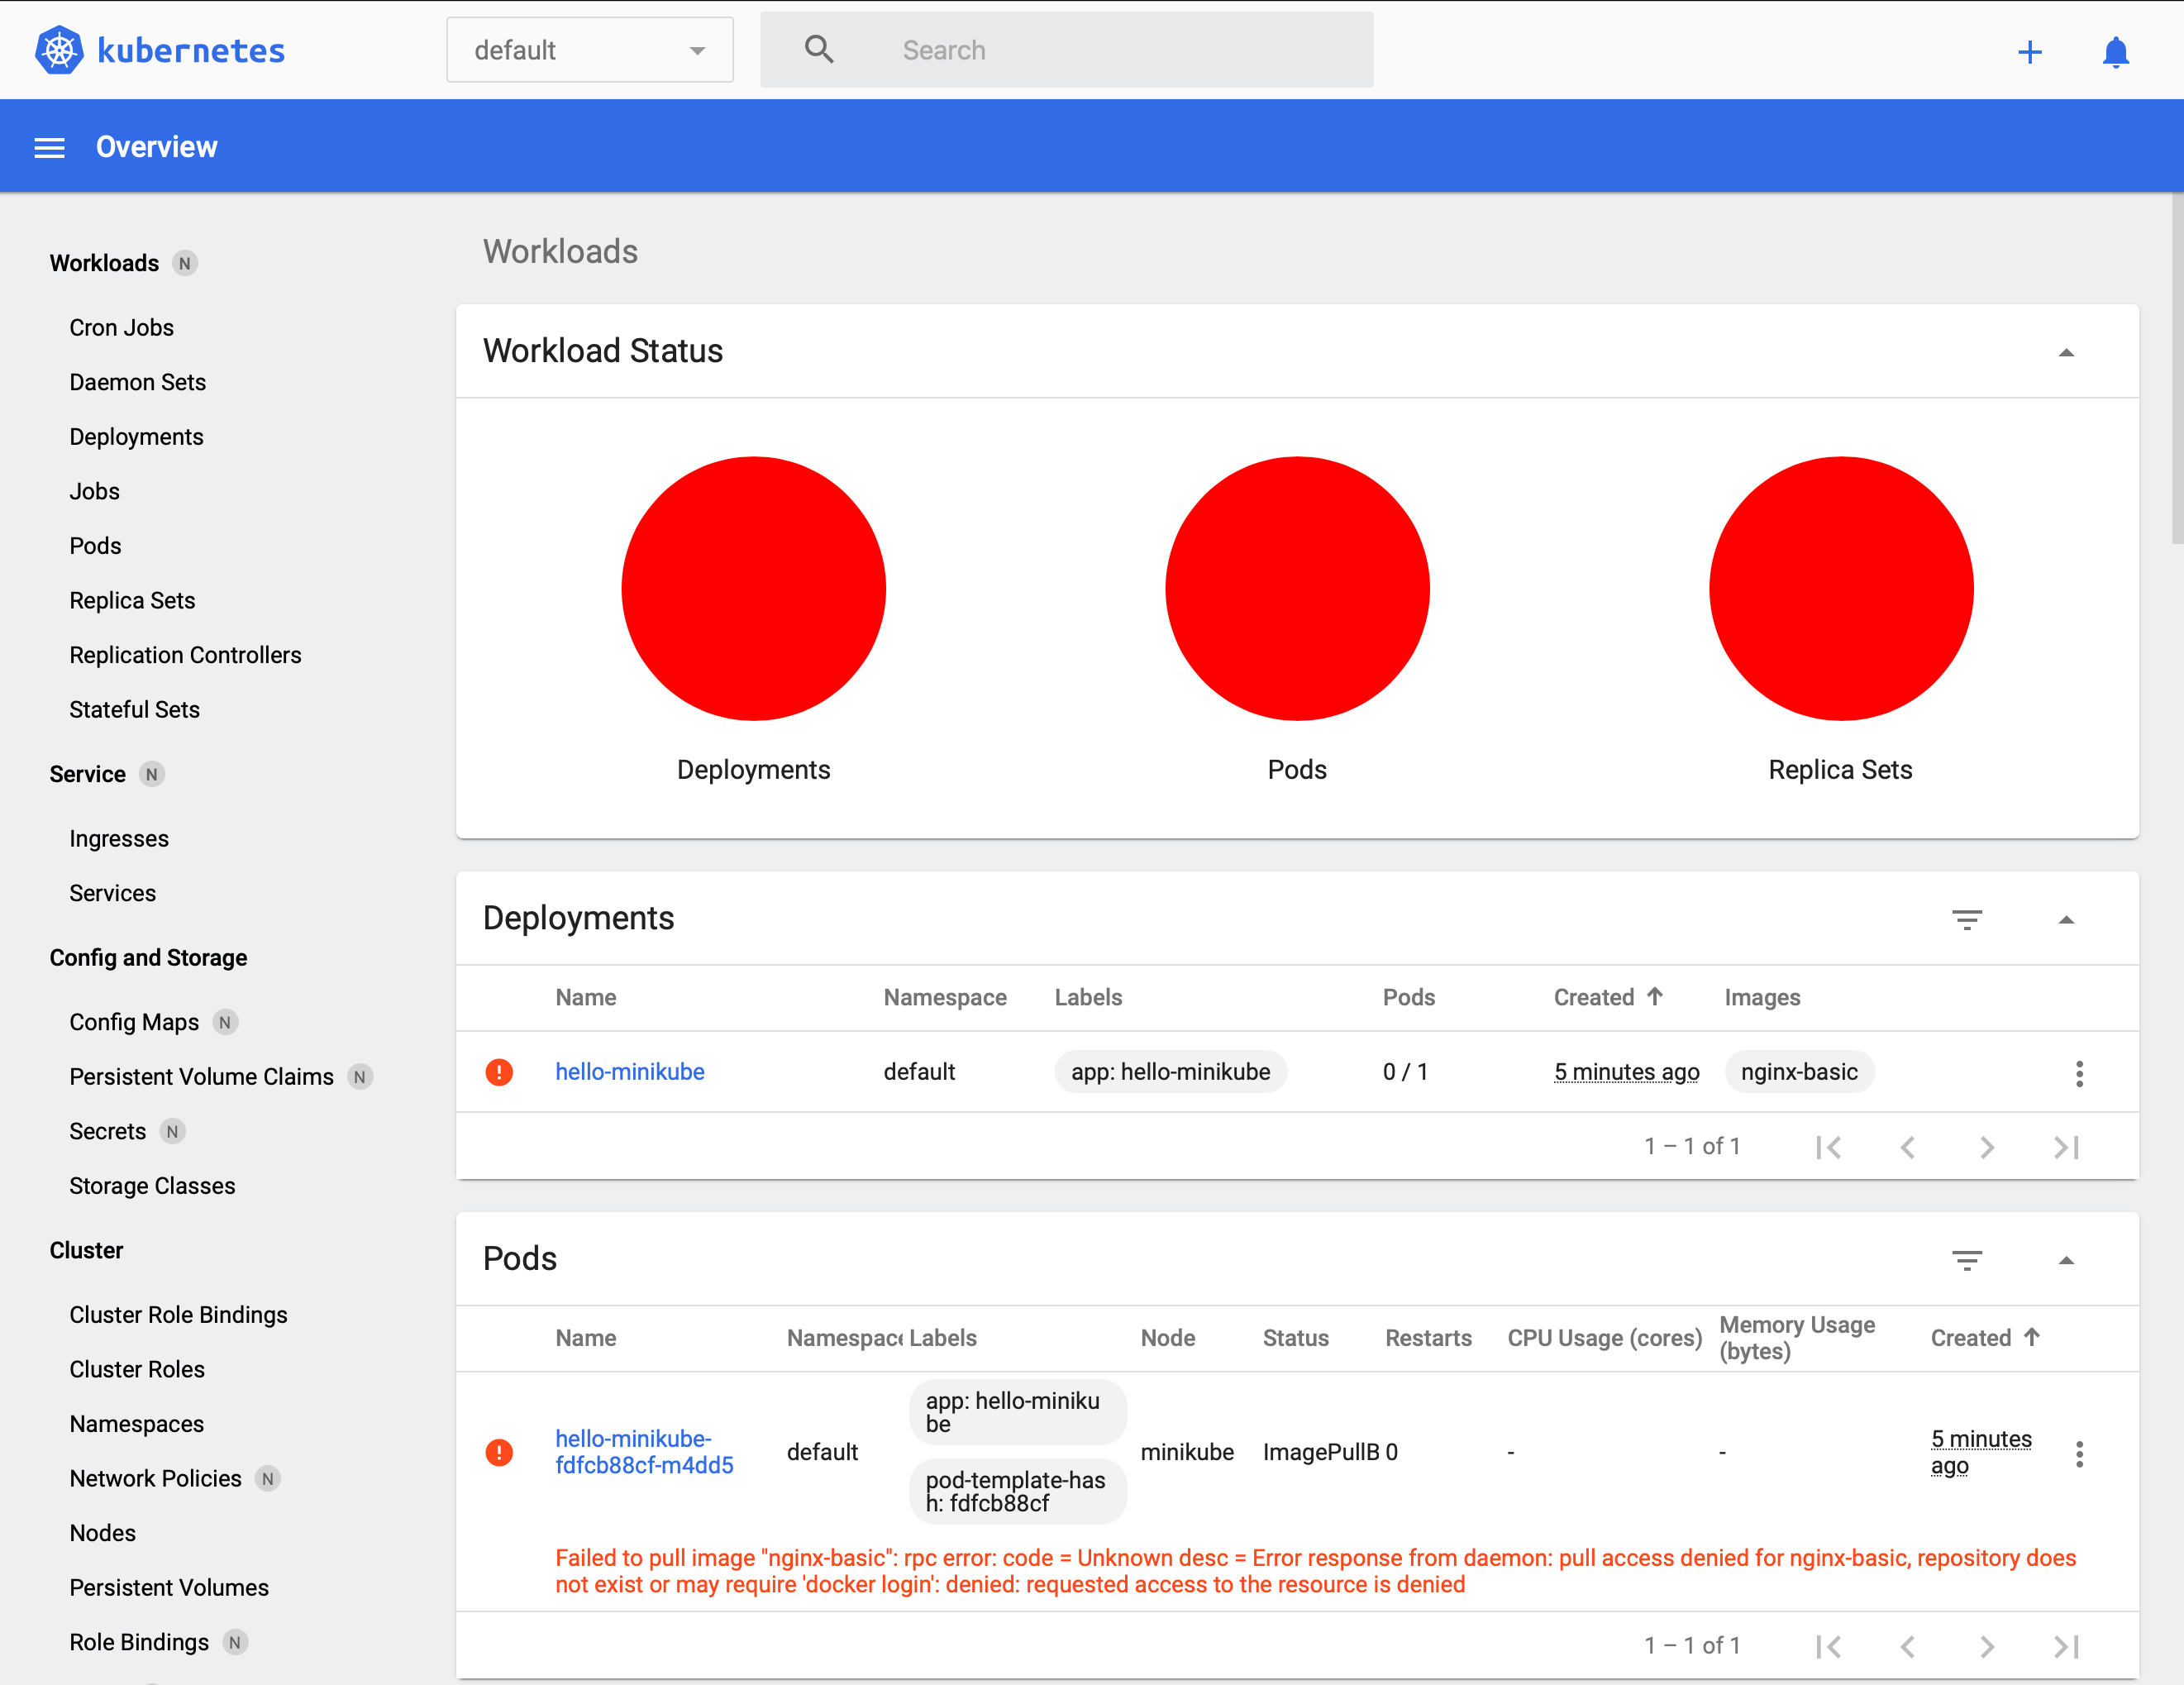 Everything is red, this doesn't look good. Click one of the small red dots to reveal the message about what went wrong.
Failed to pull image "nginx-basic": rpc error: code = Unknown desc = Error response from daemon: pull access denied for nginx-basic, repository does not exist or may require 'docker login': denied: requested access to the resource is denied
This message is a little deceptive, access wasn't actually denied, the image doesn't exist in Minikube’s Docker repository. That’s right, Minikube runs its own Docker.
So how do we get our image in there? We have to switch our command line’s environment to access Minikube's docker. Run % eval $(minikube -p minikube docker-env) █
Now we can build our image with % docker build . --tag=basic-nginx █ .
Since we’ve switched docker environments, now it’ll be available to Kubernetes.
Delete the old deployment then run the same deploy command again. We should have all green lights in the Kubernetes dashboard now.
Accessing the container
Service
A service is how we expose a set of pods to the network.The service knows where to route by matching its selector to the deployment’s matchLabels.
In this example, the port routes traffic internally to the same port it exposes externally. Different routing configurations are possible but this is all we’ll need.
Deploy the service by running % kubectl apply -f nginx_service.yaml █
Ingress
An ingress is how traffic gets from the outside world into the Kubernetes cluster.
First we need to enable an ingress controller. Cloud services have their own controllers but in development we’ll use a simple nginx ingress controller.
Install it by running % minikube addons enable ingress █ .
Now we can create the ingress resource.The rules match the request so different requests can be routed to different services. We’re matching all requests prefixed with "/" and routing them to our service named ‘nginx’.
Deploy the ingress by running % kubectl apply -f ingress.yaml █
Wait until our ingress is ready with an endpoint ip address. It can take a couple of minutes. Run % kubectl get ingress █ and when an address is shown, navigate to that IP to view the output from the container.
You can delete deployment we created here. We’ll be creating a new one that can handle php. The service and ingress can be reused.
Running Laravel
Starting from the ground up, first we’ll create the php-fpm container then we’ll configure Nginx to serve static assets and direct php requests to the php-fpm container.
Building Laravel
First create a new Laravel application and in the root of that directory, create a file called Dockerfile.Make sure your docker environment is set to Minikube as before.
Run % docker build . --tag=laravel-php █ from inside the Laravel project's directory with the new Dockerfile.
Deploying Laravel
Nginx also needs access to the static assets from our Laravel application. We’ll create a shared volume that’s accessible to Nginx and php. On deployment, our Laravel php container will copy the static assets to the shared volume.
First we create the persistent volume claim.Deploy by running % kubectl apply -f volume.yaml █
The volume exists in the Minikube virtual machine. You can access it by running % minikube ssh █ then % cd/tmp/hostpath-provisioner/default █
Next include the shared volume into the deployment.Deploy by running % kubectl apply -f php_deployment.yaml █
We use a lifecycle command to copy the laravel application to the shared volume. Nginx will serve from the shared volume.
This strategy isn’t perfect because each time a pod is created, it copies the contents to the shared directory. This can cause unexpected downtime. Shared volumes are also problematic when using multiple nodes. We’ll solve that when we get into the production environment.
Accessing Laravel
If you tried to access through the ingress’s endpoint, you will receive a 503 error. We still can’t access our application because php-fpm doesn’t know how to handle HTTP requests. For that we need an Nginx reverse proxy.
In our basic Nginx setup earlier, we used docker to build an image of Nginx with the configuration file added. This time we’ll add the config file in using Kubernetes. That allows us to more easily manage the configuration.Pay attention to fastcgi_pass php:9000;. ‘php’ references a named network location which we will create with a service. Data is passed to it using port 9000.
Deploy by running % kubectl apply -f nginx_configmap.yaml █ and let’s keep going.We create a service named php which is referenced in the nginx_configmap.yaml and open port 9000.
Deploy by running % kubectl apply -f php_service.yaml █
The last thing we need to do is create the Nginx deployment with the configuration file and the shared volume.Deploy by running % kubectl apply -f nginx_deployment.yaml █ .
Browse to the address given by the ingress and you should see the Laravel start page. That’s it for a very basic setup.
In the paid production guide, we’ll dig into a fully fledged production setup covering Redis, MySQL, Horizon, and Laravel’s scheduler. We’ll run CI/CD using Github Actions and a zero downtime deployment script.